How to Make a Simple Digital Scrapbooking Layout
A digital scrapbooking layout doesn't have to be complicated to be effective.
Sit beside me as I re-create this digital scrapbooking layout and show you how it was done. I used a program called Xara for this page, but you could use your favourite photo editing program.
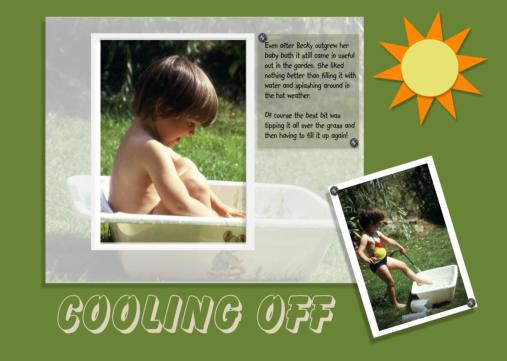
The journaling reads:
"Even after Becky outgrew her baby bath it still came in useful out in the garden. She liked nothing better than filling it with water and splashing around in the hot weather.Of course the best bit was tipping it all over the grass and then having to fill it up again!"
Choosing the photographs
I picked two photos of Becky for this page, a close up and one showing the whole scene. As I was creating a digital scrapbooking layout I scanned the pictures into the computer, which allowed me to change the sizes of the originals. I shrunk the scene and concentrated on the close up photo first.
Cropping the photo
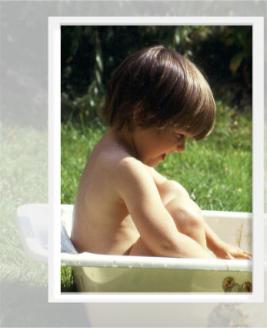
I cropped out some of the distracting background from the main photograph leaving the bath in the picture and giving my daughter a little headroom.
Although I wanted to leave the bath intact I wanted to focus the viewer's attention on the child. So I created a simple, narrow, white border for the section of the photo I wanted to highlight.
Then I created another rectangle, coloured it white and lowered the opacity so that the photo behind was still visible, if subdued. Finally I removed the area of translucent rectangle that covered the child, in effect creating a mount or matt.
The photo, translucent mat and white border were then grouped so that they could all be moved at once without disturbing their arrangement.
The second photo was left uncropped and I centered it on top of a plain white rectangle to create a similar white border.
The background
In this digital scrapbooking layout I wanted the photos to stand out and grab the attention so I opted for a plain background. I drew a rectangle that covered the whole page and used the eye-dropper in Xara to pick a green from the grass in the main photo. Sending the rectangle to the back put it in place behind the photos. This plain background gave the impression of the grass extending beyond the edges of the photo. I didn't add any grass texture to the background as I felt it would distract from the photos.

The digital elements
Embelishments to a digital scrapbooking layout are known as elements. They can be simple or look almost realistic. For this page I wanted ultra simple!
I drew a circle, used that eye-dropper again to pick up the yellow from Becky's swimming costume and I had the centre of my sun. An orange star shape with 10 points created the sunrays and was layered behind the circle.
The only other elements used were brads to "hold" the photos and journal box onto the page.
Arranging your digital scrapbooking layout
As the photos were action shots of a child having fun I did not want to create a static layout. I had started this process by using different sized photographs and I now continued by placing the large picture off centre. Angling the smaller picture to fill the bottom right hand corner, overlapping part of the larger photo, added a little movement to the layout.
Studying the photo showed me where the sun had been on that day, so I tried to place my paper cutout sun in a similar position to lead the eye to expect shadows on the opposite side. Each element on the page was then given a shadow to match the angle of my paper sun.
The wording
All that was left to do was add a title and the journal box. I picked a font for the title that also had a shadow, but this time it was facing the wrong direction. Although at first I was disappointed I then realised that this actually jolted the brain and gave some needed contrast.
Placing the text under the larger picture allowed the viewers eye to read the words and then continue around the page to the smaller picture, the sun and back to the main photograph.
I placed the journal box on top of the translucent rectangle giving the eye somewhere to stop before it travelled back to the main photograph again.
Its been fun having you sit here with me while I talked you through the creation of this simple digital scrapbooking layout. I hope you have picked up some tips that you can use on your own pages.
Digital Scrapbooking | Scrapbooking | School |
